|
Backing
Up Movies: DVD Shrink Tutorial
DVD Shrink is a totally free, single application solution. Its not nearly as complicated as Nero's solution. However, I feel you get a better resultant copy with Nero. You have to decide for yourself.
Step 1: Open the DVD with DVD Shrink
Software
Needed:
-
DVD
Shrink (freeware: Download | Visit
Homepage)
Summary: Use this to copy the files from
the DVD to the hard drive while removing the protection.
- Download and
install DVD Shrink.
- Run
DVD Shrink.
- Insert
the DVD you want to copy.
- Select
Open Disc .
If you have more than one DVD drive, it will ask which one to use.
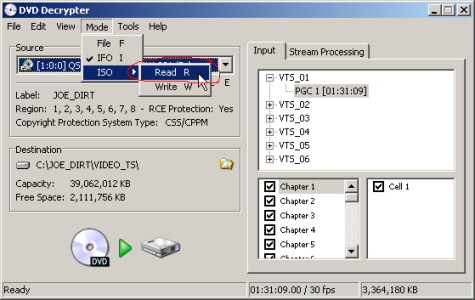
- The program will analyze the disc. This can take many minutes.
Step
2: Removing Unwanted Features
Software Needed:
- DVD Shrink (freeware: Download | Visit Homepage)
Summary: Remove/compress content to make DVD-9 fit on a blank disc.
This is a critical step. Since most DVDs are DVD-9 (8GB) and your blank disc is a DVD-5 (4.7GB) something has to go. Either you need to REMOVE things you don't want (like trailers or extras) and you will need to RECOMPRESS the video of the main movie to fit properly in the remaining space. If you remove something wrong, you can cause the resulting disc not to play right.
Here is the main screen you will see AFTER its done anayzing.
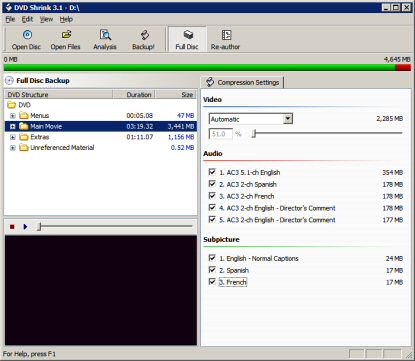
- Check to see if the recompression percentage is acceptable. Take a look at the percentage on the top right.
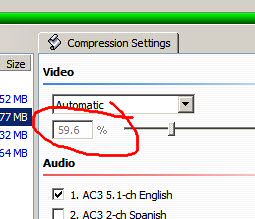
TYPICALLY (and this varies from movie to movie) you will want this value to be 60% or better. The higher this number (100% is the best), the BETTER your movie will look. Opinions on what the 'magic number' is vary from person to person. You will learn, over time, what is acceptable for you.
During the following steps, when this number hits the target value you want, you can stop removing elements and go on to Step 3.
- Make sure that you have MAIN MOVIE selected on the left . It should default to that, but double check.
Note: Some movies have TWO copies of the movie on the disc; widescreen and full screen. Typically, you will only want to keep one copy (hopefully the widescreen version). Before continuing, expand the MAIN MOVIE tree and make sure only ONE entry is there.
If there are two, and you want to keep BOTH, you will need to select each one in turn and follow the below steps for EACH entry.
Chances are likely, you only want ONE of them. DVD Shrink doesn't handle this easily at this time. I recommend you use Nero Recode instead. However, you can choose to replace the movie with still images and NO audio to get it the smallest possible. See below REMOVING EXTRAS.
- Remove Audio Tracks you to not want.
Most of the time, there will be numerous audio tracks you do not need.
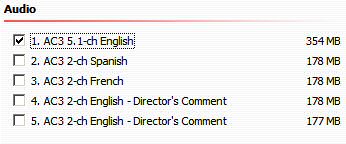
In this sample, we've unchecked EVERYTHING except the English track. You will likely see a very different list on your DVD. You might see a DTS track, several AC3 English tracks (not pointed out as Director Commentary), and several other languages. NORMALLY ... the biggest track in MB (in this case, 354MB) is the best one. If you have a DTS decoder on your home theater, you might ONLY select the DTS track. If you want to make sure it works on all machines, you might want to choose the DTS AND the first English audio track (normally AC3 5.1-ch English). The more you get rid of, the more room is available for the movie - the quality will go up.
- Check to see if the recompression percentage is acceptable. (see above)
- Remove subtitles. Subtitles are the words that you can turn on (like closed captions) during the movie that show what the actors are saying (or describing noises). Chances are likely you will want to remove them.
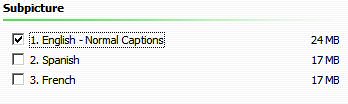
While you might be tempted to remove ALL subtitles, I recommend you leave English subtitles. If the movie has a section in a foreign language (like Klingon :), and the movie shows you, in English text on the bottom, the translation, the DVD might use subtitles to display these. Birthday Girl is a good example. If you remove the subtitles, the long scenes in Russian will not be translated for you.
- Overcompress/Remove Extras. Many people don't care about extras like trailers, bloopers, featurettes, etc. To get that magic compression percentage up, you might want to overcompress/remove the extras to make MORE room for the movie. Note: If REMOVING extras is your plan, use the Nero Recode tutorial. You can, however, replace the extra with still frames with no audio.
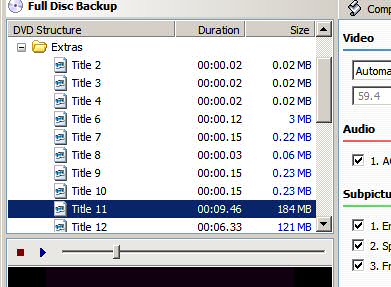
You can select each extra (as you can see, they aren't named) and use the preview window at the bottom to see what each extra is. You'll learn by the size (the more you do this) what is a trailer, what is a featurette, etc. Right now, the extra in our example is 184MB.
OVERCOMPRESSION
Once you select an extra, the Video compression percentage will change, showing you how much DVD Shrink decided to recompress that extra. To make that extra smaller, you'll need to override the Video compression and choose a smaller value.
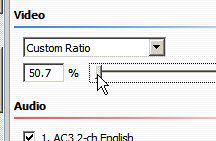
Change to CUSTOM RATIO, and move the slider to the lowest value. This will make that extra as small as it can be. Remember, you can also remove subtitles and audio tracks from these too (although its rare you will have that sort of option). After changing this to 50.7%, the size of the extra is now 160MB.
REMOVAL
You can't really REMOVE the extra, but you CAN replace the whole movie with still blank images, remove ALL the audio and subpictures and make it VERY SMALL.
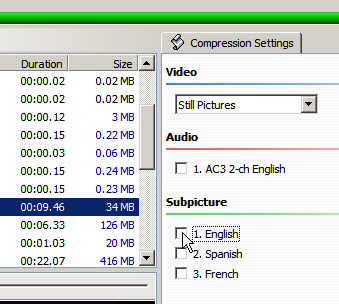
Change Video to STILL PICTURES. Uncheck all the Audio and Subpictures. You can now see that we've reduced the size to 34MB.
After EACH extra altering, go up and click MAIN MOVIE and see where your recompression percentage stands. No need to continue hacking away if you have the size you want.
Repeat this procedure for each extra until you have a MAIN MOVIE compression percentage you like.
Step
3: The Backup Process
Software Needed:
- DVD Shrink (freeware: Download | Visit Homepage)
Summary: Backup the DVD to the hard drive.
We now move on to moving the protected DVD content to the hard drive as an unprotected, recompressed ready-to-burn DVD.
- Hit the BACKUP! button on the top.
- Choose where and how to burn the disc. If you have Nero installed, you can use the Nero engine to write the new DVD directly to your burner, or as an image file. If not, you need to at least select a new folder to put the DVD files.
- Double check the other settings. Poke through the other tabs on the Backup window and make sure everything is how you want it.
- Hit OK . This will start the process..
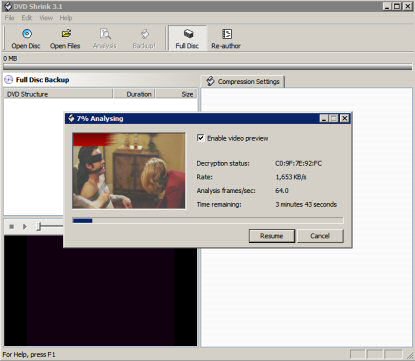
The encoder window will appear and show you the remaining time, a preview window, etc. This deprotects, compresses, and otherwise processes the DVD. This can take anywhere from 30 minutes to a couple hours (or more).
If you elected to burn the DVD directly in Nero, then the DVD will burn, and you are done. If not, you have one more chance to make sure the movie is good before you burn it.
I recommend that you always write the movie to the hard drive first (even if its just a Nero Image File - you can mount that as a DVD image and test it out later).
Step
4: Check and Burn The Movie
Software Needed:
-
Any DVD software player (WinDVD, PowerDVD, etc)
- Any DVD writing player (Like Nero)
Summary: Check the movie, burn it.
Load your favorite software and check out the movie. If its acceptable, use your favorite DVD software to write the files to a DVD-Video.
Congratulations!
You're done! Not too bad, eh? I hope this tutorial helped you
out.
|