|
Backing
Up Movies: Nero Recode Tutorial
Last Updated 8/21/2003
Nero Recode
is an amazing thing. The interface is fabulous and the features
are great. But it is beta and anything can happen!
Step
1: Removing the CSS Protection
Software Needed:
- DVD Decryptor (freeware: Download
| Visit Homepage)
Summary: Use this to copy the files from
the DVD to the hard drive while removing the protection.
Step
2: Mount the DVD Image as a Drive (or Burn ISO if small enough)
Software Needed:
- Alcohol 120%
(Trial: Download;
$49.95 | Homepage)
Summary: Mount your unprotected DVD disc
image as a drive or burn the ISO image directly if its small enough.
The image that
DVD Decrypt made isn't directly accessible to either Instant Copy
or to Nero Recode, so we must create a 'virtual' DVD drive to mount
the image. You do not have to use Alcohol 120% for this if you have
another package like Daemon Tools. Our instructions, however, are
for Alcohol 120% only.
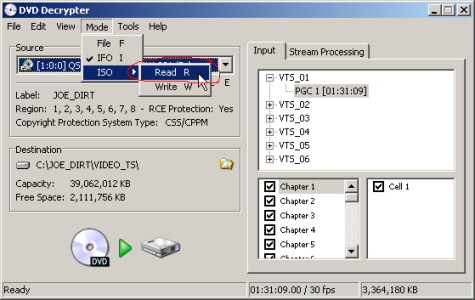
- If
the .iso file is less than 4.7GB, you do not need to mount the
image - just use DVD Decryptor to burn the
ISO to a blank DVD and you're done.
The DVD image is already small enough to burn.
To burn, open DVD Decryptor. Select MODE->ISO->WRITE. Click the folder icon to choose the disc image you just made. Stick in a blank disc. Hit the big button on the bottom and you're done!
- Install
Alcohol 120%. Make sure you have at least one virtual drive device
available.
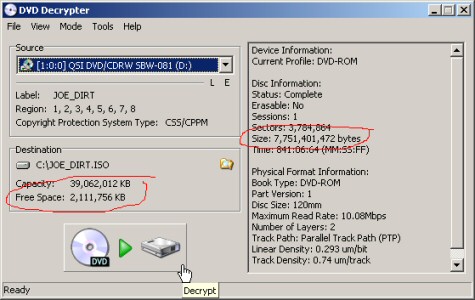
- Open
your hard drive and find the movie image created by DVD Decrypt.
There
should be a .iso file and a .mds file. Note the size of the .iso
file.
- Right
click the MDS file and select MOUNT IMAGE-> (E:) AXV CD/DVD-ROM
(0). (Your
drive setup might be slightly different.)
- Verify
that you successfully mounted the image.
Browse the drive you just mounted the image on and make sure that
it works and there is a VIDEO_TS folder in there.
Step
3: Preparing the Movie with Nero 6 Recode
Software Needed:
-
Nero 6 Ultra Edition (Trial: Download; $69.99 |
Visit Homepage)
Summary: Use this to remove unwanted parts
of the DVD & recompress it to fit on a blank DVD.
This product
will serve two purposes; removing unwanted content and shrinking
the remaining content to fit your fresh new blank DVD. While Nero
Recode has a lot of potential, if you have ANY problems, remember
its still new - and try the Instant Copy
Tutorial.
- Install
Nero 6 Ultra Edition. Make sure you have the LATEST version of
Nero Recode installed! They release new versions all
the time. Double check your version!
- Run
Nero Recode. Its
located under Nero->Nerovision Express 2.
- Select Copy Entire DVD to DVD.
- Click
IMPORT DVD button.
- Select
the virtual drive you have mounted your DVD image into and hit
OK.
If everything is okay, you will see an ANALYZING box come up and
you can see the program parse through the video. This will take
a couple minutes.
- Once
done, you will immediately see a break down of Movie vs Extras.
This is the resampling quality required to fit all the
content on the blank DVD. If this number is anything
less than 60% for the movie, I would recommend removing/changing
some items on the new DVD to ensure best quality.
Nero will try to automatically remove all
extra audio tracks and subtitles, as well as come up with the
optimum compression settings for each "extras" video.
You should check each item under
Main Movie and Extras to be sure you agree with Nero's interpretation.
Nero will often remove soundtracks you will probably want. ALWAYS
CHECK! Each version of Nero gets smarter and smarter, but double checking is the right thing to do.
If you do not want a Title (say a set of trailers, deleted scenes,
or whatever, simply select the title and hit DISABLE. This will
remove it SAFELY from the DVD, replacing it with a customizable
"video has been removed" screen. This is a safer method
than Instant Copy.
Do check out PROFILES - there are many nice presets in there you
can choose.
- Once
you're happy with everything, hit NEXT.
- At
this time, you can either burn your DVD, or save the contents
to the hard drive. We recommend saving them to the hard drive.
Once you're comfortable with Nero's settings and you are sure
of your choices, you can burn directly - right now. However, the
smart money is on writing the files back to the hard drive, previewing
the DVD to make sure you're happy with it, THEN burning. However,
it will take more hard drive space to do this.
Step
4: Test the new DVD files
Software Needed:
-
Any DVD software player that will play files from a hard drive (i.e.
Nero Showtime)
Summary: Preview the new DVD files for
quality before committing them to a DVD.
The new files
are ready to burn - but until we're comfortable with Nero, we better
check the quality and stuff before we burn a precious blank DVD!
Any player that you can point to a folder on the hard drive should
do the trick. Luckily, Nero Showtime is included in the Nero 6 package
and will do the trick.
- Open
your DVD player software and play back the new DVD files. Check
the menus, make sure they work as you would expect. Check the
quality of the movie. Skip around to high action scenes and make
sure the quality is acceptable to you.
- If
you are happy with the new DVD, you may now burn the files.
Continue to Step 5.
- If
the quality is NOT satisfactory, or you feel you could have done
better distributing the compression, you may delete the new DVD
files, and repeat Step 3 with different choices.
Be sure to keep your Recycle Bin empty so you have room to work!
Step
5: Burn the files to a Blank DVD
Software Needed:
-
Nero 6 Ultra Edition (Trial: Download; $69.99 |
Visit Homepage)
Summary: Burn the files to a blank DVD.
We know you're
using Nero 6, so we might as well use it to burn!
- Open
Nero->Nero 6 Ultra Edition->Nero Burning Rom.
- If
the wizard pops up (otherwise select File->New), select the
CD dropdown and choose DVD.
- From
the icons, choose DVD-Video.
- You
may want to choose the LABEL tab and name this disc the same as
the original.
- Select
NEW.
- Using
the File Browser on the right, drag and drop the new DVD files
to the left window. Use
the example folders as a guide to ensure you get the file structure
right.
- Be
sure your DVD writer is selected as the burner and hit the BURN
icon.
- Test
the image in your PC, DVD player, or wherever you will be watching
it. Be sure its okay before you delete the files from your hard
drive!
- Delete
the files and any other intermediate files we've created if you
haven't done so already.
Congratulations!
You're done! Not too bad, eh? I hope this tutorial helped you out.
|