|
Advanced
Authoring
Because of the
great price and ease of use, we are going to use DVD-lab for our
authoring tool. These tutorials will assume you already have captured
video either in DVD format or SVCD format. This tutorial will not
only get your video onto a DVD, but we'll show you how to make DVD
menus (still and animated), scene selections (still and animated),
create chapter stops, and how to relink everything to your own liking.
This is a long one, but useful. We will ASSUME a very basic understanding
of MPG, SVCD, TMPGenc, etc. This is NOT for beginners.
Making
Your First DVD
Step
1: Acquiring your assets
Software Needed:
- Various
Summary: Get your stuff together BEFORE
you start!
- Gather
all your videos together in one place. For this tutorial,
I'll be using the SVCD rip of the TV show DEAD LIKE ME (1x6).
You can use your own DVD compliant capture or another SVCD.
- Create
custom backgrounds. DVD-lab
has lots of premade backgrounds, but I like something a bit more
custom. Click here to
see my DEAD LIKE ME background.
- Custom
audio clips. You
will probably want some sound for your menus. Create or borrow
a sound loop or two. We'll be using two loops - one for the main
menu, and one for the chapter selection screens. These MUST
be 48k/16bit/Stereo WAV files.
- That's
about it - we're ready to start!
Step
2: Importing Assets
Software Needed:
- DVD-lab (30 Day Trial: Download;
$79 | Visit
Homepage)
Summary: Get all your assets into DVD-lab,
transcoding any SVCD audio that is not DVD compliant.
- Download
and install DVD-lab.
- Run
DVD-lab. It
looks daunting, doesn't it? Not too bad .. just bear with me.
- Locate
the asset area on the bottom left. This area has several
tabs on the bottom that says VIDEO & AUDIO, BACKGROUNDS, etc.
This is where pre-made backgrounds, objects, and your custom assets
are stored.
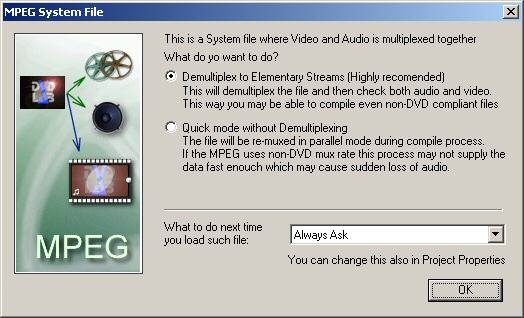
- Right
click this area and select IMPORT. A file requestor will
open. Select your video file. DVD-lab will ask if you want to
convert the file to ELEMENTARY STREAMS.
- Convert
your file to elementary streams. Depending on how big
your file is, this can take a LONG LONG time. But its for the
best. You can watch the progress in the Asset Area.
- View
errors, if any - and transcode the audio as necessary. If
your video is SVCD, or your DVD capture has incorrect formatting,
you will get a box telling you that some errors or warnings occured.
If you are using valid DVD video but incorrect audio in your file,
or you are using an SVCD, you will get an error about the audio
not being correct.
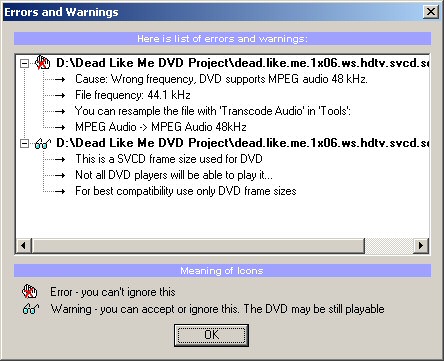
Hit OK and you will be asked to TRANSCODE the audio.
Just accept the defaults and hit TRANSCODE. This will take a bit
of time, but not as long as the demuxing did.
If you have fully compliant DVD video and audio, you won't need
to perform this step.
IF TRANSCODING FAILS ... DVD-lab
may give you some sort of error during the transcode (something
about accessing the file). If this happens, you will need to transcode
the audio seperately. See a seperate tutorial, TRANSCODING
SVCD AUDIO.
- Import
the new transcoded audio. If transcode above was successful,
then the new audio already appears in your assets. If not, you'll
need to right click and hit IMPORT and add the transcoded audio
to your assets.
If not, repeat the process until you have both a valid video and
audio track for your video.
- Add
menu audio. If you have audio for your menus, import
them the same way. I'll be adding two WAV files to the project.
Your asset area should look something like this:

- Click
on the BACKGROUND tab of the asset area. We're going
to be adding our background image for our menus. You will see
a bunch of premade still backdrops for your movie.
- Right
click and select IMPORT. Select your custom background. In
my case, I'll add my Dead Like Me backdrop. You will get asked
if you want to copy it permanently to your backgrounds. Go ahead
and do so. The thumbnail will show you your picture has been added.
- We
now have all the assets we need to make our DVD!
Step
3: Adding the Main Movie to the Project
Software Needed:
- DVD-lab (30 Day Trial: Download;
$79 | Visit
Homepage)
Summary: Get your movie into the project.
- Locate
the project area on the upper right. This big area probably
has a couple of sub-windows in it like CONNECTIONS and MOVIE1.
Note the tabs underneath that will bring the named window to the
front so you can work on it.
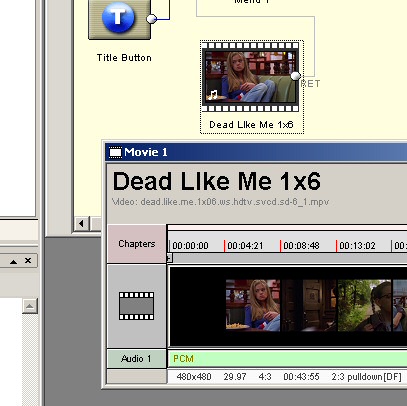
- Bring
the MOVIE1 window into view by clicking the tab.
You will see a window with a timeline on it featuring chapters,
video, and audio tracks.
- From
the assets window, left drag the VIDEO file you imported earlier
and drop it on the filmstrip denoted track in the MOVIE1 window.
Note,
you may have to click the VIDEO & AUDIO tab in the asset area
to see the assets again. You will see a series of thumbnails generated
in the MOVIE1 window with some time stops.
- Fromthe
assets widnow, left drag the AUDIO file you imported earlier and
drop it on the AUDIO1 track. The
area will change color to denote you have successfully added the
audio.
- Bring
the CONNECTIONS window into view by clicking the tab below the
project area. You
should see a few boxes, including the MOVIE1 box.
- Right
click the MOVIE1 box and select RENAME. Rename
your movie to something that makes sense to you. You should see
something like this:
Notice how there is a line connecting the movie to the MENU 1.
This will make more sense as we work with it.
Step
4: Creating Chapters (auto)
Software Needed:
- DVD-lab (30 Day Trial: Download;
$79 | Visit
Homepage)
Summary: Break your video into chapters
not only for the convenience of viewing but also to assist in making
scene selection menus.
- Select
the MOVIE 1 tab below the asset area to bring the video into view.
- Locate
the PREVIEW window on the bottom right. Above the window is an
Auto Chapters button:
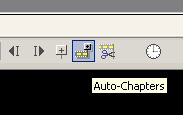
Click this button.
- Choose
ADD and enter 11 in the chapters window. Click OK.
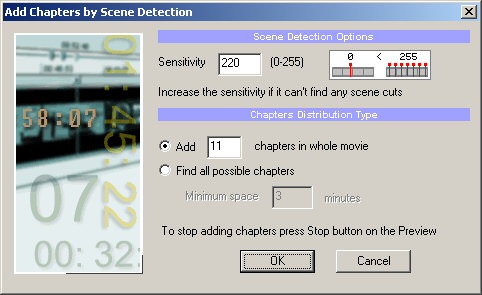
Your
video file will be parsed (you get to watch) and it will select
some chapter breaks based on scene changes in your movie. You
will see little red carrots appear on the MOVIE1 window showing
where the chapters are. You may change them later. For now, let's
move on.
- Your
chapters are ready.
Step
5: Creating Scene Selections
Software Needed:
- DVD-lab (30 Day Trial: Download;
$79 | Visit
Homepage)
Summary: Let DVD-lab make you a menu full
of thumbnails for each chapter.
- Using
the pulldowns, select MENU -> ADD SCENE SELECTIONS.
- You
will get a pop up window. Select your movie, menu1 and the yellow
selection on the bottom:
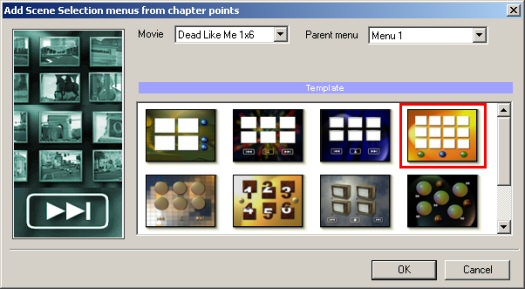
Hit
ok. Then hit YES when asked. It will tell you it successfully
created the menu.
- Locate
the project tree on the top left. Under MENUS, double click the
SCENES 1 FOR <your movie name>. This will bring
up your newly made menu of scene selection into view.
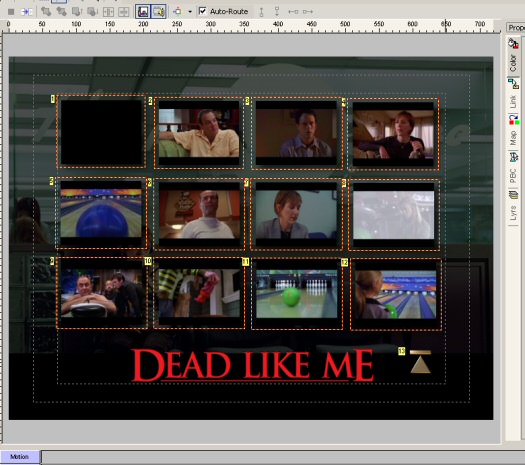
- Change
out the background with your own - under assets, click the Background
tab and locate the thumbnail to your imported background. Left
drag it and drop it near the edge of the existing orange border.
This will trade out the background for your own.
- If
you would like, you may remove the balls by single clicking them
and hitting Delete. Be sure not to select the up carrot
(its gold) - that is the menu item that takes the watcher back
to the main menu. You can also move the up carrot around by left
dragging - put it somewhere where it meshes well with your background.
Something like this:
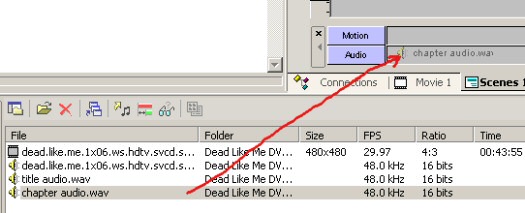
- If
you have an audio track to play during your scene selection, drag
it from the assets area to the AUDIO track located under your
scene selection menu.
- We're
done making the chapter selection menu.
Step
6: Creating the Title Menu
Software Needed:
- DVD-lab (30 Day Trial: Download;
$79 | Visit
Homepage)
Summary: Create the main menu including
branches for starting the movie and going to the chapter selection
menu.
- Select
the CONNECTIONS tab under the project area.
- Double
click the ROOT box (its light purple). A
blank menu will come up.
- Add
your backdrop to the menu. From the BACKGROUNDS area of the asset
manager, find the thumbnail for your backdrop and left drag it
to the menu area in the project area. Your image will
become the backdrop of the menu.
- Add
an image from the movie to the menu for aesthetics. Use the preview
window slider to scroll through your movie and find a nice frame.
Left drag the image to the menu area.
Put it where you want, say centered on the right.
- Add some
menu items. Click the TEXT button in the upper left:

Click somewhere on your menu where you want to place text.
- Select
a font (we'll use ARIAL 40 point size) and type in "Play
Movie". Hit OK. You
may then move the text wherever you like by left dragging. To
change the color, use the FILL COLOR located in the upper right
hand corner of the menu editor.
- Repeat
this process and put a "Scene Selection" item on the
screen.
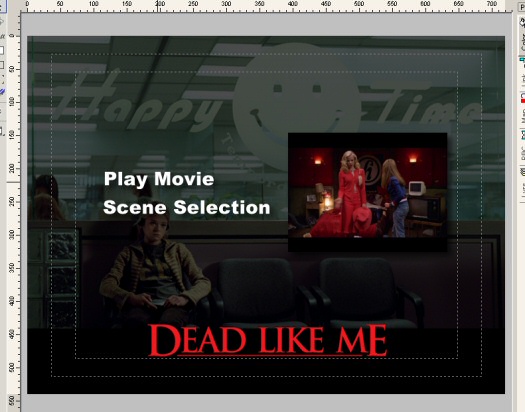
Might look something like that.
- Now
link the PLAY MOVIE text to the movie. Right click the PLAY MOVIE,
select LINK->your movie name->MOVIE START. The
Play Movie is now linked to the start of your movie.
- Link
the SCENE SELECTION text to the chapter selection menu. Right
click SCENE SELECTION, select LINK->SCENES 1 FOR <your movie
name>. That text is now linked to the scene selections.
- Add
your audio clip to the menu. As before, drag the audio
clip from the asset window to the audio track area of the menu.
- Your
menu is now done.
Step
7: Testing Your DVD
Software Needed:
- DVD-lab (30 Day Trial: Download;
$79 | Visit
Homepage)
- Software DVD player (Nero Showtime,
PowerDVD, WinDVD)
Summary: Test the menus before making the
DVD files.
- Select
the pulldown PROJECT->COMPILE DVD. This opens the
compile DVD window.
- Check
mark TEST COMPILE. This will create only the navigational
stuff while leaving the movie clips alone. This is a fast way
to test to make sure everything is ok before you do the long part
of remuxing the video and building the vob files.
- Hit
Start.
Depending on your machine speed, this will only take a moment.
- Close
the compile DVD window.
- Minimize
DVD-lab.
- Open
your software DVD player.
- Point
it at the files in the C:\DVDVolume\VIDEO_TS folder.
- Try
it out. Go to your scene selections. Try the up carrot.
Step
8: Burn your DVD
Software Needed:
- DVD-lab (30 Day Trial: Download;
$79 | Visit
Homepage)
Summary: Burn the full DVD.
- Select
the pulldown PROJECT->COMPILE DVD.
- Check
the AUTOMATICALLY START BURNING WHEN COMPLETED box.
- Hit
OK.
Your
movie will fully build and finally burn. This can take a great
deal of time. Once burned, your DVD is ready to play.
Note: If you used SVCD files, your DVD player MUST play SVCD movies.
Believe it or not, many players do not.
|